When you open a new or existing survey, you will land on the survey editor. Here is an overview of what you will find.
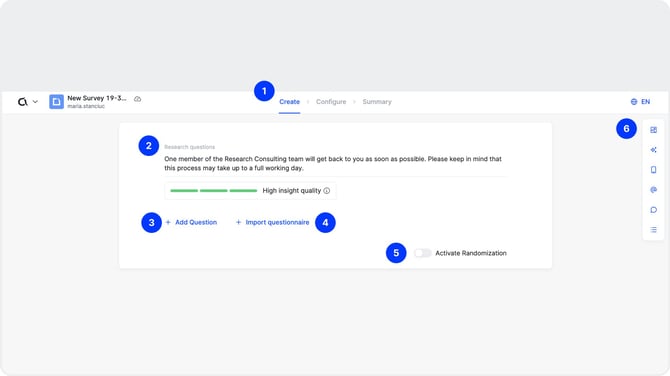
1. The navigation bar
At the top of the editor, you will see a navigation bar. This section shows you the stage you are in when conceptualizing the survey. Click the next step to move along the process.
2. The research objective
At the top of the survey editor, you can define the main research question for your project. This is the overarching objective that your survey is designed to answer, for example "Which of our two new product concepts resonates more with our target audience?" The research objective is not shown to respondents. It serves as an internal reference point to keep your team aligned on the purpose of the survey throughout the creation and analysis process.
3. Add question
Underneath the Research Objective section, the "+ Add Question" button is your starting point for building your questionnaire. Click it to select a question type or load a saved or template question. For a full walkthrough, refer to the Adding and Editing Questions article.
4. Import questionnaire
Next to the "+ Add Question" button, you will find the "Import Questionnaire" button. This allows you to bring an existing questionnaire into Appinio directly from an external file. Supported formats include .doc, .xls, .ppt, and .pdf. You can import your file by dragging and dropping it, browsing your device, or pasting content directly from your clipboard.
5. Activate randomization
The randomization toggle applies question-level randomization across your entire survey. When enabled, the order in which questions are presented to respondents is randomized, rather than following the fixed sequence you set during creation. This helps reduce order bias, where the position of a question in a survey can influence how respondents answer it. Note that this is a survey-wide setting and is separate from the answer-level randomization available within individual questions.
6. Additional options
- Add Media lets you bulk upload images before you start building your questions. Rather than adding images one by one as you create each question, you can upload all your media assets in one go and then assign them to the relevant questions as you go. This is particularly useful for surveys that involve multiple visual stimuli, such as concept tests or packaging tests.
- Open Simulator opens a mobile preview of your survey, showing exactly how each question will appear to respondents in the Appinio app. Use this to check the layout and flow before submitting.
- Add Collaborators lets you invite team members to work on the survey draft with you. Collaborators can view and edit the questionnaire in real time.
- Comments opens the comment panel, giving you and your team a space to discuss the survey, flag questions for review, or communicate with the Appinio research team. For more details, refer to the Adding and Managing Comments article.
- Jump to Question lets you navigate directly to a specific question in your survey by selecting it from a list. This is especially useful when working on long questionnaires where scrolling through every question would be time-consuming.
Once you are familiar with the survey editor, you are ready to start adding questions. If you have an existing questionnaire ready, use the Import Questionnaire feature to get started quickly. Otherwise, click "+ Add Question" to begin building your survey from scratch. Refer to the Adding and Editing Questions article for a full walkthrough of the question creation process.